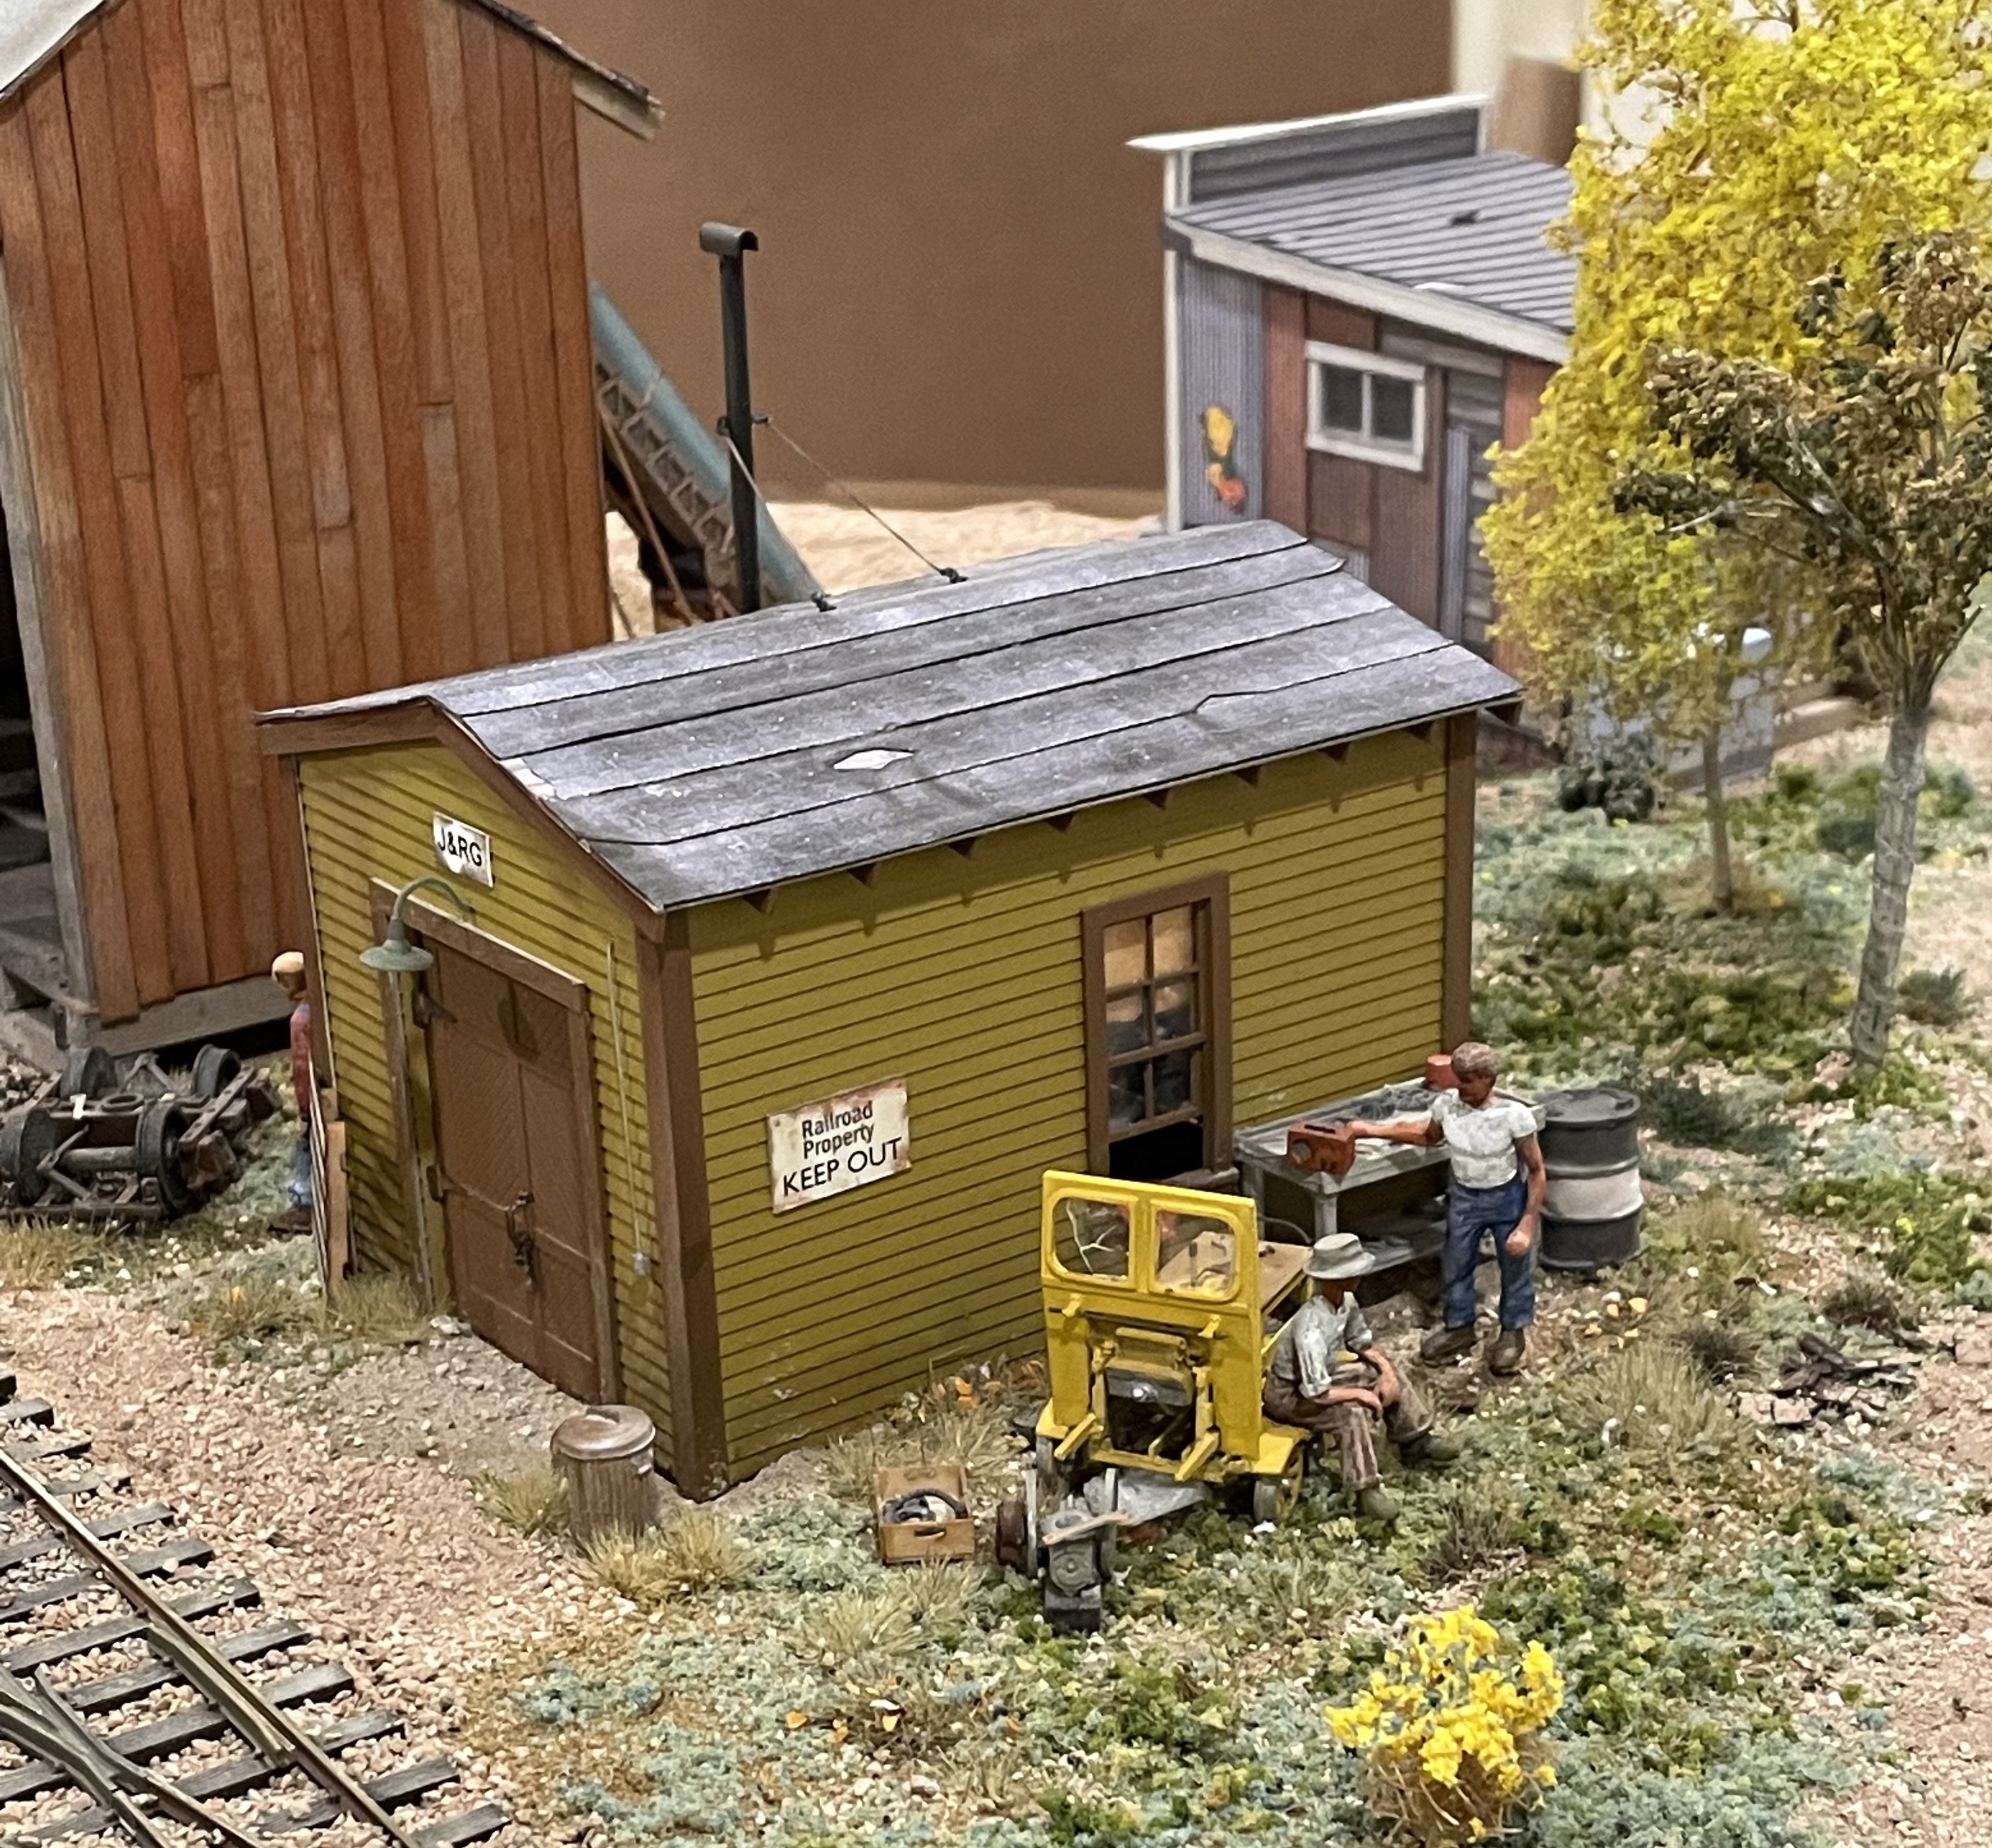
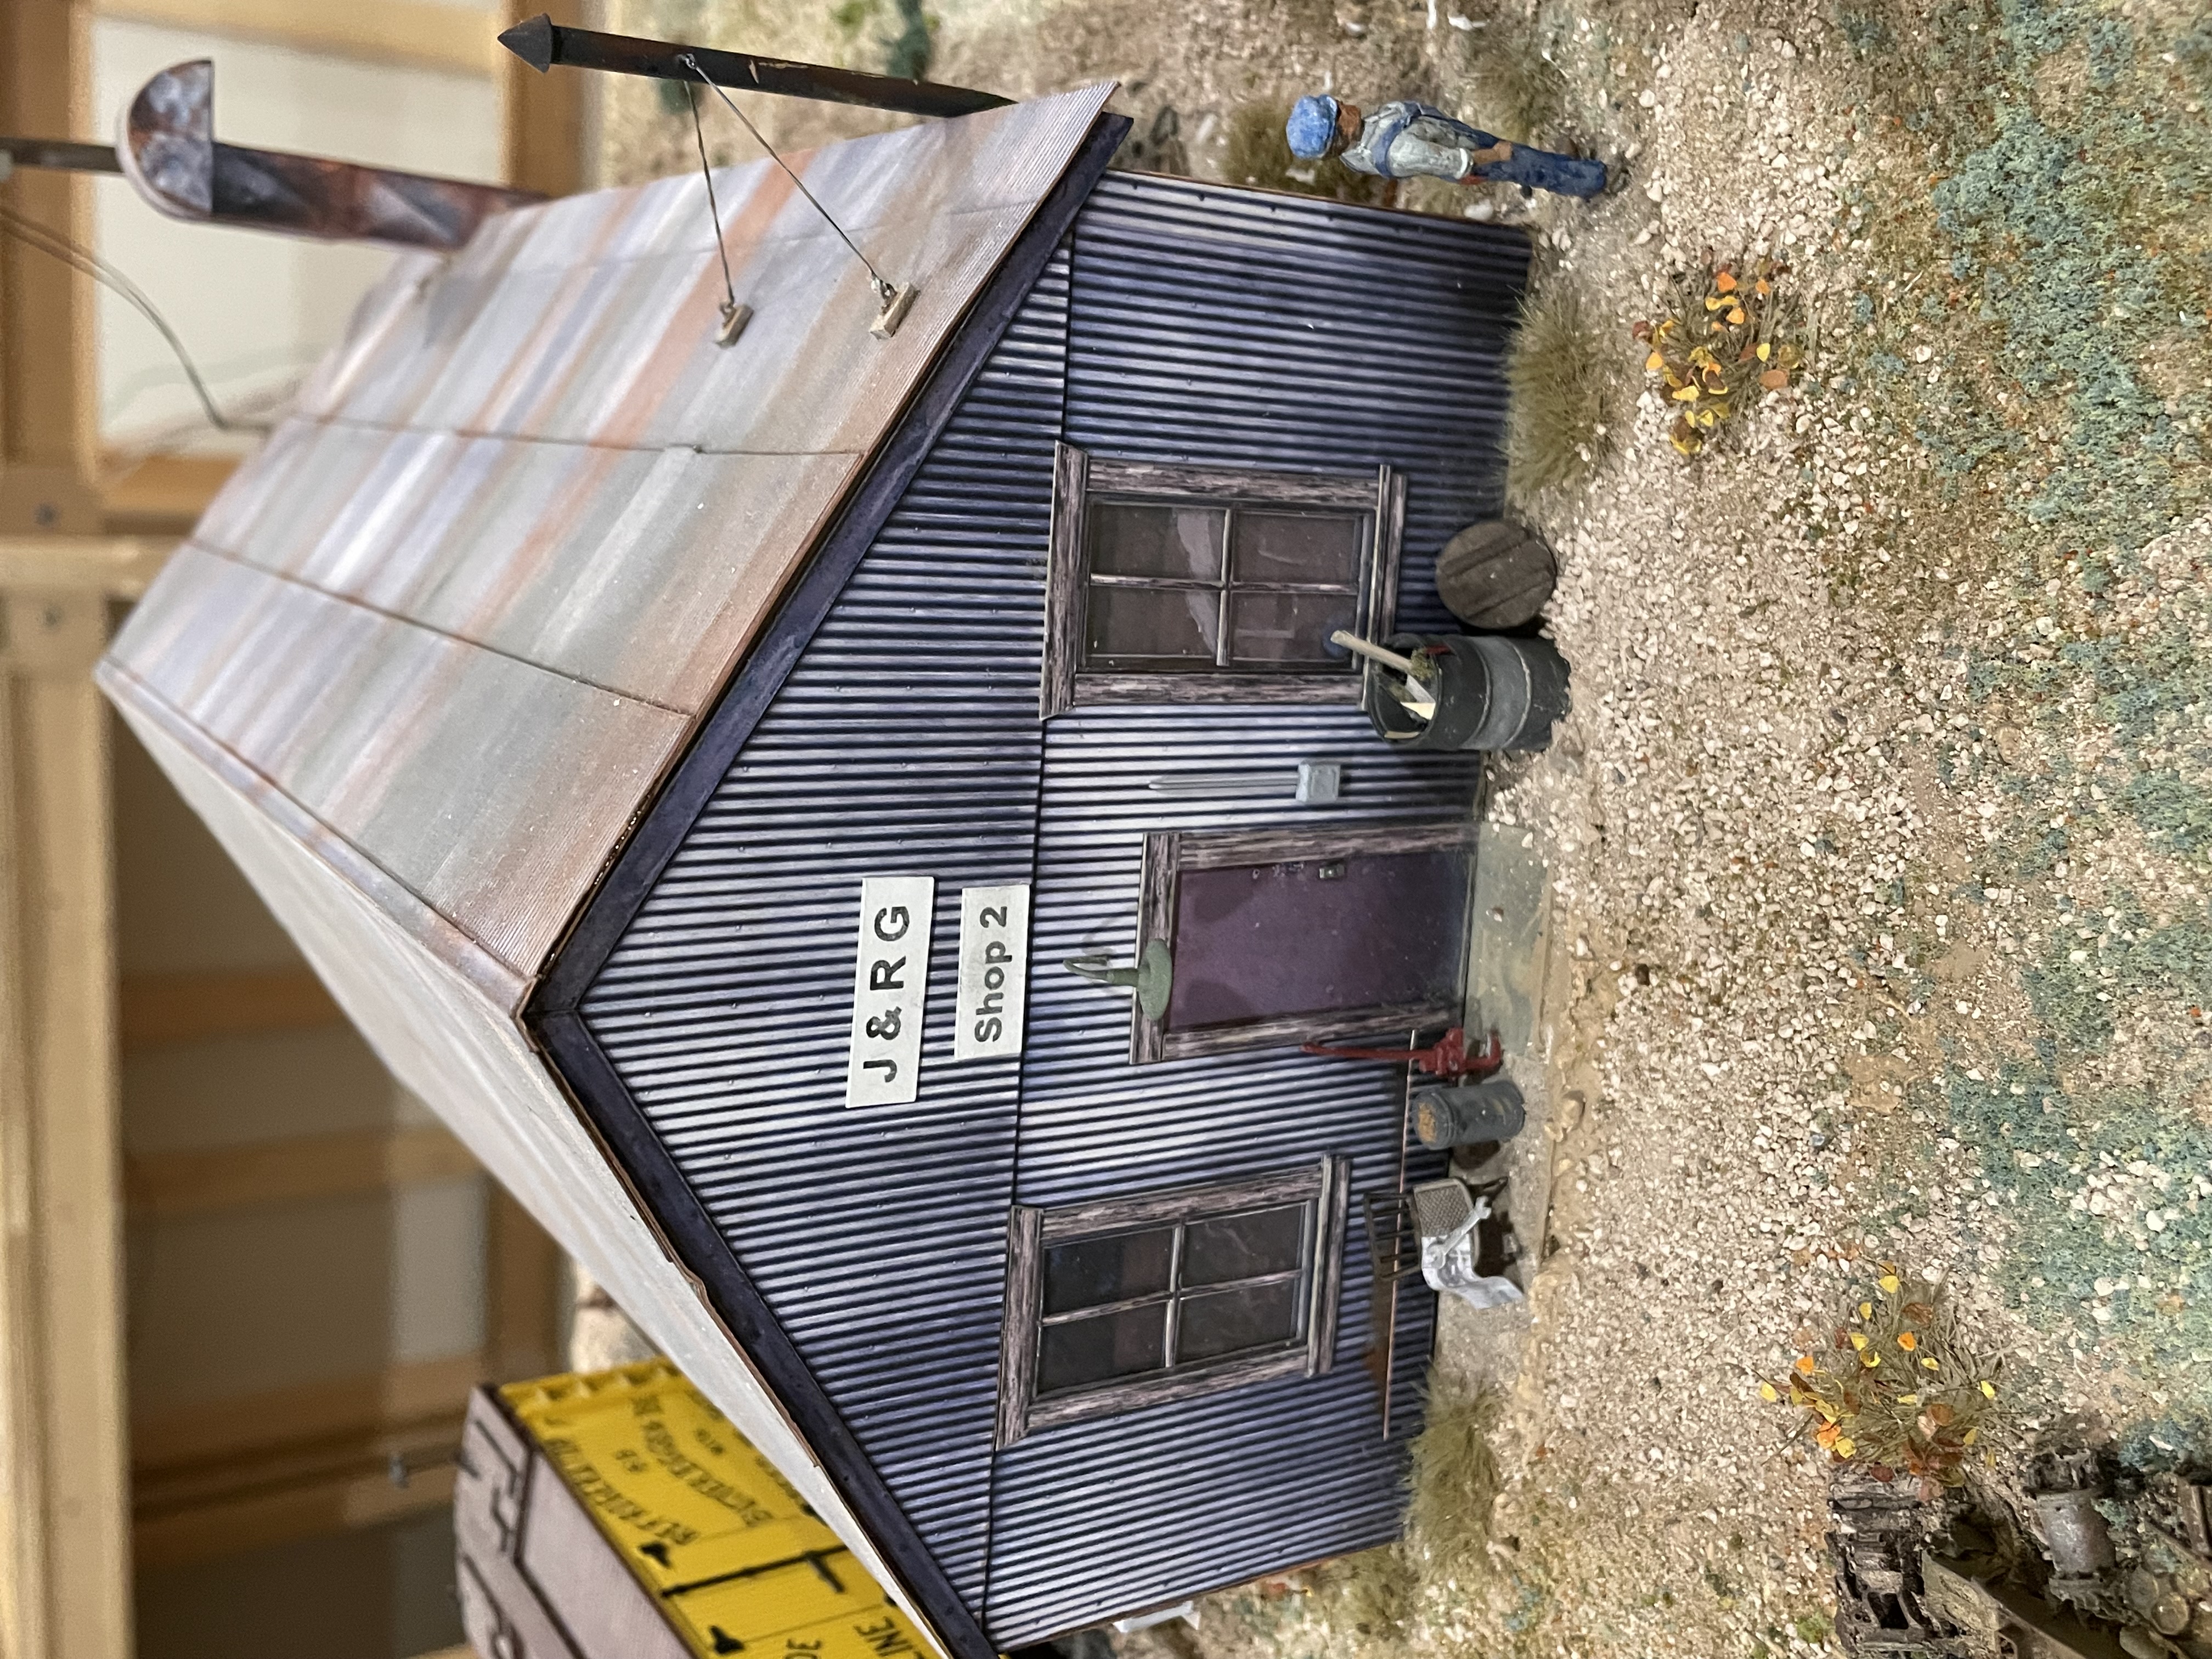
1. MWTM® - Introduction to Scratchbuilding in Styrene
Title: SCRATCHBUILDING A SMALL STYRENE BUILDING)
Cost: $60
Scale: HO
Date: Monday, August 5, 2024
Time: 7:30am - 11:30am
Lead Instructor: Jim Gore, MMR® , assisted by MMRs Peter Youngblood, Clark Kooning, and Carl Smeigh.
In this clinic Jim and his team of MMRs will take you through the steps of scratch-building a small shed (or yard office) out of styrene materials. Styrene
is easy to work with and you will be shown the basics of working with this material. Jim’s team will share tips and tricks in working with this versatile material. Time is limited, so at the end of the clinic you may not have the small building completed but will leave with all the necessary information and materials to complete this project on your own.
Participants need to bring their own tools to participate in this clinic!
This is a suggested list of tools that may be required to participate fully in the hands-on portion of our program. Bring any other tools you usually use or might find useful. To allow you to fully take part in the building of models, you are strongly encouraged to have all the tools listed. You, however, may not use all of them in this program, but you will have them for future building. Most of the tools listed can be found at your local hobby shop, hardware store or craft store.
Self-healing cutting mat, minimum 8 1/2” x 12” (Mandatory item)
Xacto Knife with new #11 blades
New single edge razor blade
Toothpicks
Fine sandpaper 400 to 600 grit
Steel straight edge
Sanding stick or flat file
Straight tip tweezers
Hook tip tweezers
Assorted Paintbrushes
12” Steel ruler graduated in scale feet (for your scale)
Small triangular hobby square
Emery boards (the ones women use to file their nails)
Sable paint brush – size (000)
Soft pencil - #2
Sprue cutter
Faller Plastic Liquid Cement (Walthers Part #: 272-170492) or Faller Plastic Super EXPERT Liquid Cement (Walthers Part #: 272-170490) or Testor’s liquid cement.
Electronic nibbler (optional)
Misc. Sized Clamps & Square Blocks (i.e.: MicroMark: 1-2-3 Blocks)
Optional tools:
Opti-visor
Extra Work Light
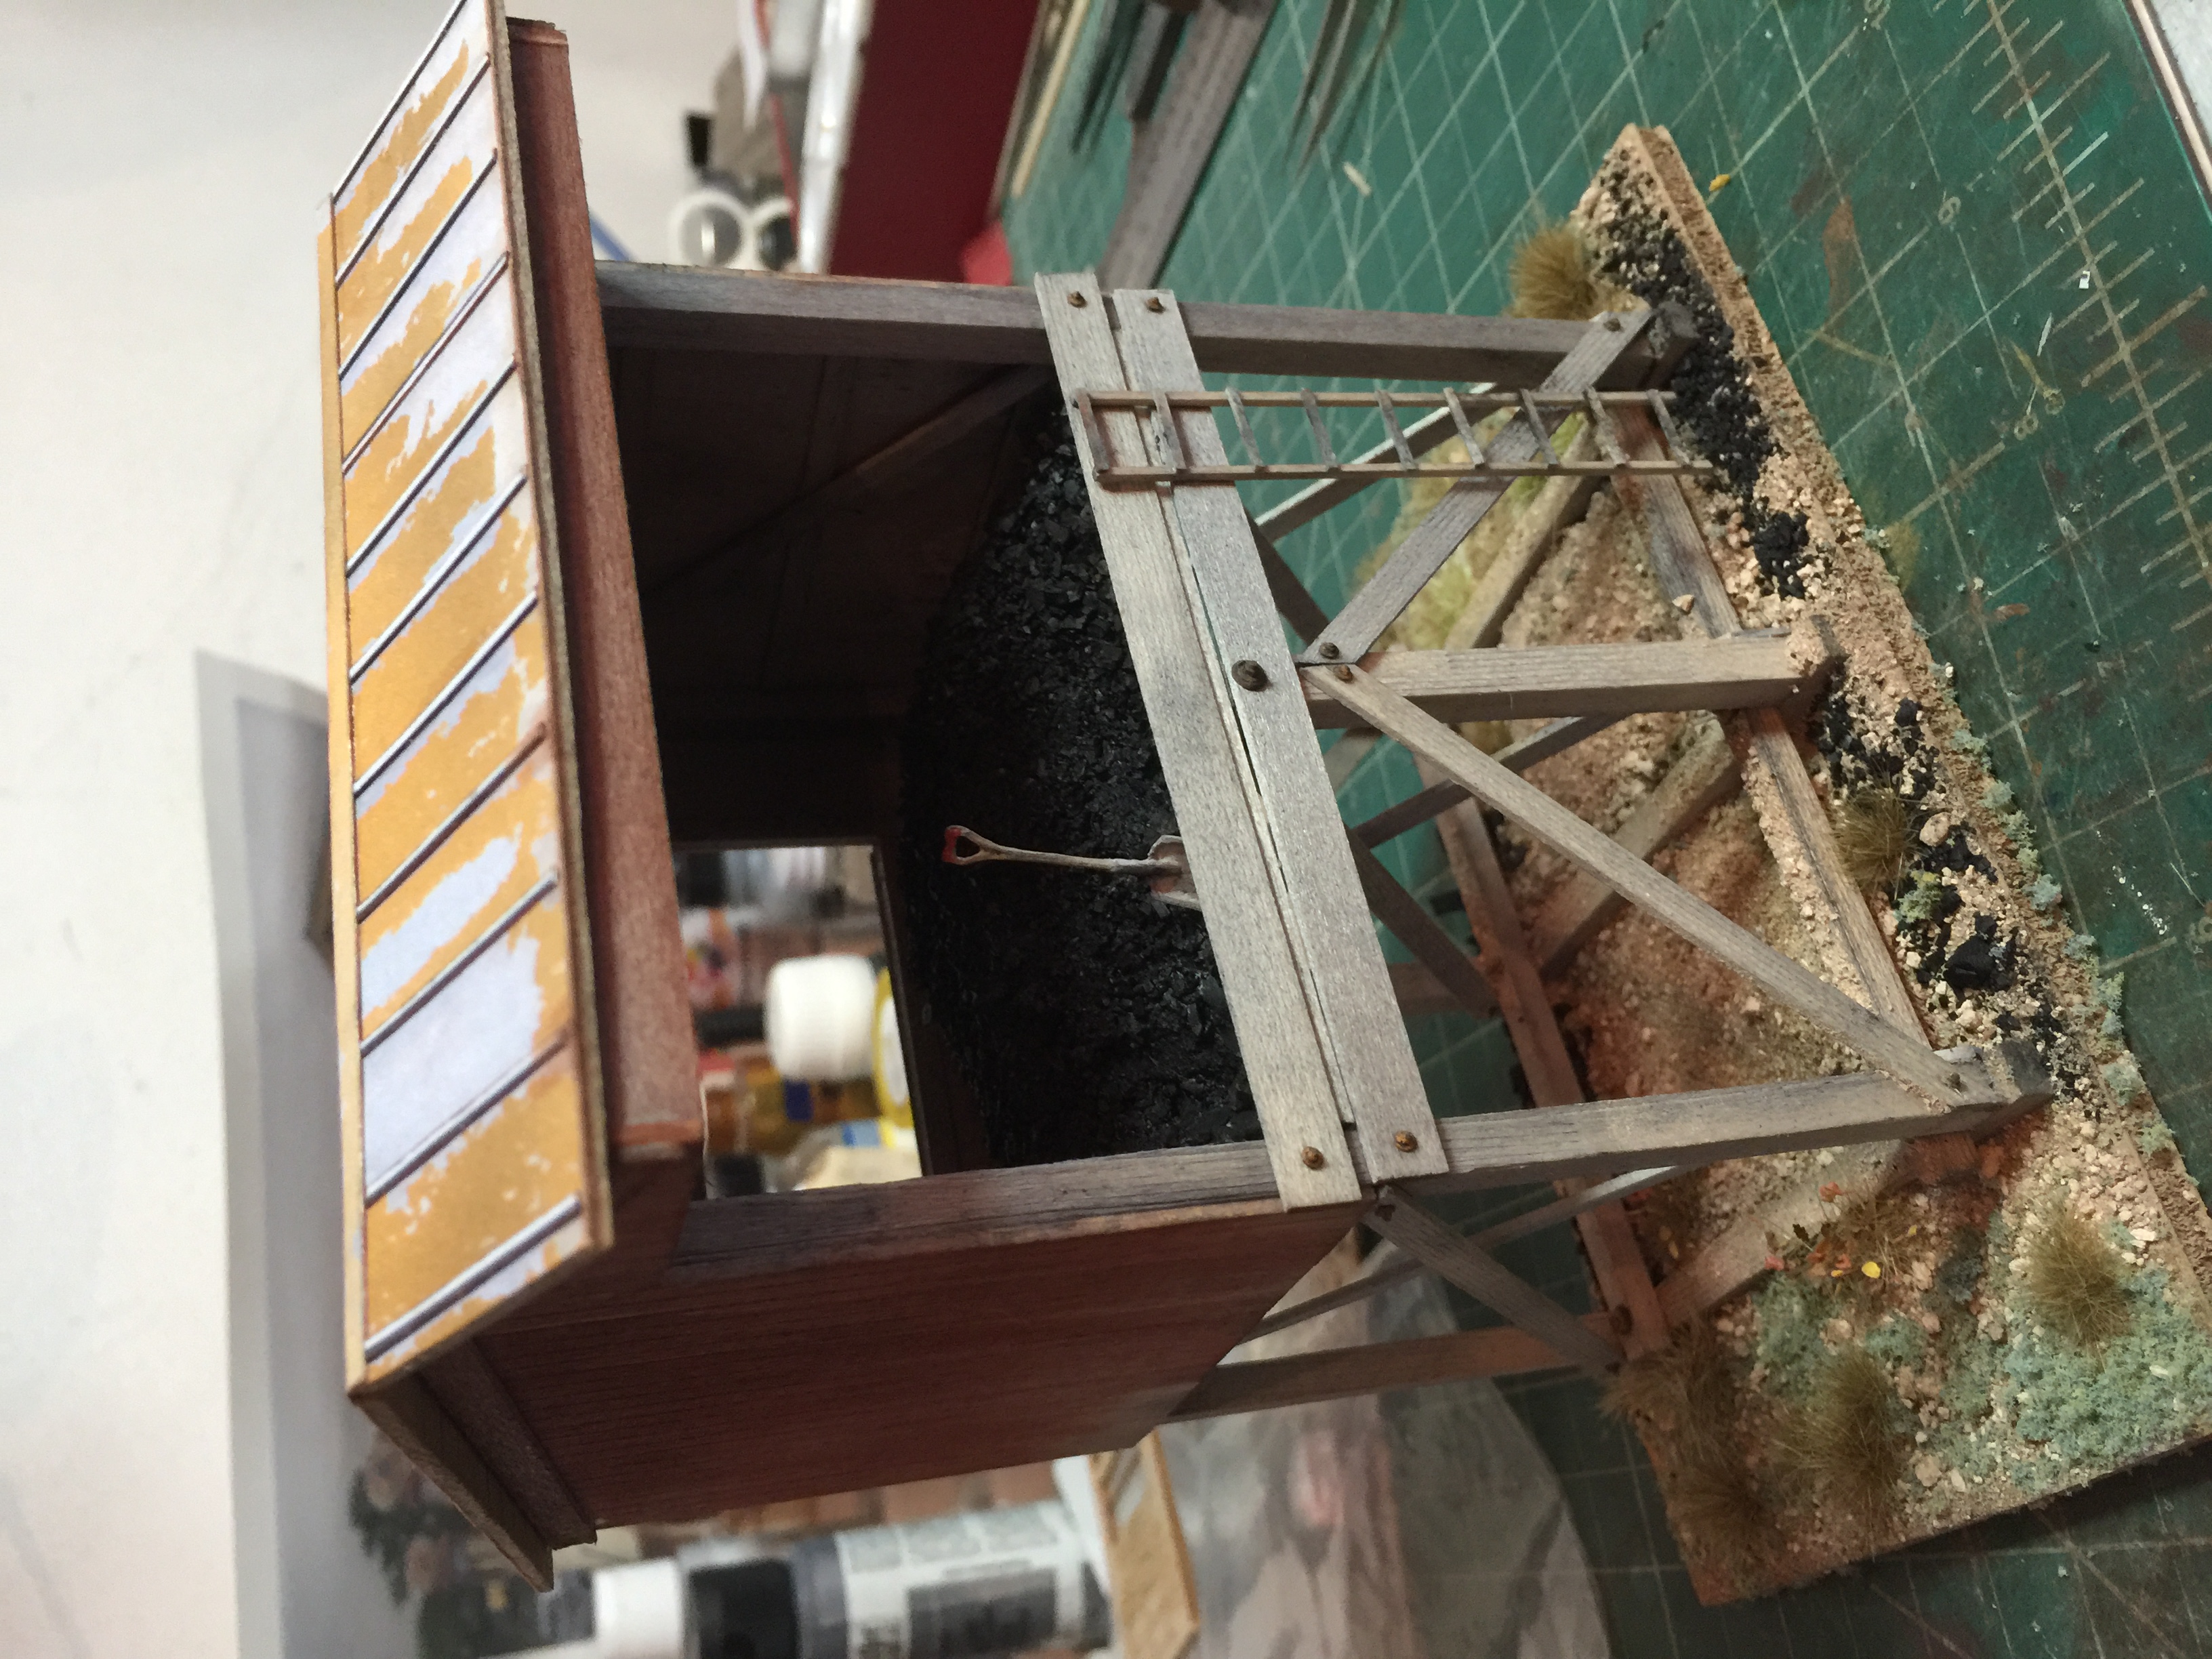
2. MWTM® - Introduction to Scratchbuilding in Styrene and Wood
Title: SCRATCHBUILDING A SMALL PUDDLE JUMPER BRIDGE (Styrene & Wood)
Cost: $60
Scale: HO or N
Date: Monday, August 5, 2024
Time: 1:00pm - 5:00pm
Lead Instructor: Clark Kooning, MMR® , assisted by MMRs Jim Gore, Carl Smeigh and Peter Youngblood.
In this clinic Clark and his team of MMRs will take you through the steps of scratch-building a small bridge with structural elements out of Styrene and wood. You
will learn how to paint or stain the wood used for the abutments. In addition, you will learn about applying small details that make this very small bridge come alive. This small bridge can be used in many layout situations. Clark’s team will share tips and tricks in working with these materials. Time is limited, so at the end of the clinic, you may not have the small building completed but will leave with all the necessary information and ma-terials to complete this project on your own.
Participants need to bring their own tools to participate in this clinic!
This is a suggested list of tools that may be required to participate fully in the hands-on portion of our program. Bring any other tools you usually use or might find useful. To allow you to fully take part in the building of models, you are strongly encouraged to have all the tools listed. You, however, may not use all of them in this program, but you will have them for future building. Most of the tools listed can be found at your local hobby shop, hardware store or craft store.
Self-healing cutting mat, minimum 8 1/2” x 12” (Mandatory item)
X-acto saw fine blade with Miter Box (make sure blade will go the depth of the miter box
X-acto Knife with new #11 blades
New single-edge razor blade
Toothpicks
Fine sandpaper 400 to 600 grit
Steel straight edge
Sanding stick or flat file
Straight tip tweezers
Hook tip tweezers
Assorted Paintbrushes
12” Steel ruler graduated in scale feet (for your scale)
Small triangular hobby square
Emery boards (the ones women use to file their nails)
1 (000)Sable paint brush
Pantone Markers--Cool gray 40% and Raw or Burnt Sienna (Art Stores)
Testor’s Liquid Cement or Similar product
Yellow or white glue
Optional tools:
Opti-visor
Extra Work Light
If you have any problems with the description of the items listed, please contact Clark Kooning, MMR, via e-mail at This email address is being protected from spambots. You need JavaScript enabled to view it. .
3. MWTM® - Working with Cora Foam
Title: IT’S SO EASY WITH CORA FOAM
Cost: $60
Scale: HO Only
Date: Monday, August 5, 2024
Time: 6:30pm - 10:30pm
Lead Instructor: Peter Youngblood, MMR® , assisted by MMRs Jim Gore, Carl Smeigh and Clark Kooning.
Cora Foam is polyurethane foam that carves like butter, paints like wood, and has countless model railroad applications in alls cales. Using this amazing material, Peter and his team of MMRs will teach you how to build a single-track concrete pedestrian underpass,
learn how to make bridge abutments, retaining walls, signal pedestals, platforms and much more.
Participants need to bring their own tools to participate in this clinic!
This is a suggested list of tools that may be required to participate fully in the hands-on portion of our program. Bring any other tools you usually use or might find useful. To allow you to fully take part in the building of models, you are strongly encouraged to have all the tools listed. You, however, may not use all of them in this program, but you will have them for future building. Most of the tools listed can be found at your local hobby shop, hardware store or craft store.
Self-healing cutting mat, minimum 8 1/2” x 12” (Mandatory item)
# 1 Xacto knife
# 11 Xacto blades (5 pack)
# 17 Xacto lightweight chiseling blade
Razor Saw w/fine tooth bladee
12” Steel ruler graduated in HO scale feet
Small triangular hobby square
Emery boards (the ones women use to file their nails)
1 Aleene's “Quick Dry” Tacky Craft Glue (White bottle)
2 Sharpened pencils
1 Package Handy Wipes
4.MWTM® - Introduction to Laser Kits
Title: : Introduction to Laser Kits
Cost: $60
Scale: N, HO, S or O
Date: Tuesday, August 6, 2024
Time: 7:30am - 11:30am
Lead Instructor: Clark Kooning, MMR® , assisted by MMRs MMRs Peter Youngblood, Carl Smeigh, and Jim Gore.
In this clinic Clark and his team of MMRs will take you through the steps of building a Laser Kit for the first time. Laser-cut wood is now used to create an array of precision-cut kits with parts ranging from walls with
door and window openings cut ever-so-accurately to extremely fine window mullions. All parts fit perfectly (even in multiple layers), making the resulting structure resemble a scratch-build model. Our project will the hands-on construction of a bunkhouse that could serve as a storage shed on your model railway. Time is limited, so at the end of the clinic, you may not have the bunkhouse construction completed but will leave with all the necessary information and materials to complete this project on your own.
Participants need to bring their own tools to participate in this clinic!
This is a suggested list of tools that may be required to participate fully in the hands-on portion of our program. Bring any other tools you usually use or might find useful. To allow you to fully take part in the building of models, you are strongly encouraged to have all the tools listed. You, however, may not use all of them in this program, but you will have them for future building. Most of the tools listed can be found at your local hobby shop, hardware store or craft store.
Self-healing cutting mat, minimum 8 1/2” x 12” (Mandatory item)
Scale ruler in your scale (a multi-scale ruler is best). Must item
Xacto knife or scalpel with #11blades
X-acto saw with fine teeth
Yellow Glue or Carpenters Glue – small bottle only
Flat needle file
Triangular needle file
Tweezers
Small modelers square (optional) or cheap math set with 30/60 degree & 45-degree triangle (buy at the dollar store or drug store)
1 Set of general-purpose brushes best example is (Royal & Langnickel Value Pack Beginner 4 pc set BK607 – which is available in Michaels with SKU number of 90672011312) or similar
¼ inch stiff nylon bristle brush (2 only)
Sandpaper 240 grit (1-2 pcs) , 280 grit (1-2 pcs), #120 grit, and #100 grit or Small sanding tools of the same grit Or a grit close to those listed.
Dental pick or similar type of tool (optional
Optional tools:
Opti-visor
Extra Work Light
Two pairs of clamps (bar clamp at least 8 to 12 inches wide-depending on the scale you model in.) Or you can also use the small “Quick-grip mini bar clamp from the makers of Vise–Grip from most hard-ware stores.
If you have any problems with the description of the items listed, please contact Clark Kooning, MMR, via e-mail at This email address is being protected from spambots. You need JavaScript enabled to view it. .
5. MWTM® - MAKING FOREGROUND TREES
Title: Making Realistic Foreground Trees
Cost: $60
Scale: Any
Date: Tuesday, August 6, 2024
Time: 1:00pm - 5:00pm
Lead Instructor: Jim Gore, MMR® , assisted by MMRs MMRs Peter Youngblood, Carl Smeigh, and Clark Cooning.
In this clinic Jim and his team of MMRs will take you through the steps to create two foreground trees: one deciduous tree (like cottonwood or oak or elm) and one conifer tree (pine, fir, spruce, or larch).
You will learn about simple techniques that help make the tree look more realistic as a stand-alone scenery item. We will also talk about how consideration of the size, shape, and height of the trees can make them a more realistic part of your scenery.
Participants need to bring their own tools to participate in this clinic!
This is a suggested list of tools that may be required to participate fully in the hands-on portion of our program. Bring any other tools you usually use or might find useful. To allow you to fully take part in the building of models, you are strongly encouraged to have all the tools listed. You, however, may not use all of them in this program, but you will have them for future building. Most of the tools listed can be found at your local hobby shop, hardware store or craft store.
Cutting mat (should be reasonable size) (suggest 18x12) (Mandatory item)
Xacto knife or scalpel with #11 blades
X-acto saw fine teeth
Forceps / Tweezers
Scale ruler for your chosen scale
#80 grit sandpaper (a single sheet)
Pin-vise and a range of small drill bits (around #74 or so)
Hot glue gun (or a hot glue pot)
2 Small squares of Styrofoam (about 6” x 6”). (the cheapest you can find – even the stuff used by florists)
Optional tools:
Opti-visor
Extra Work Light
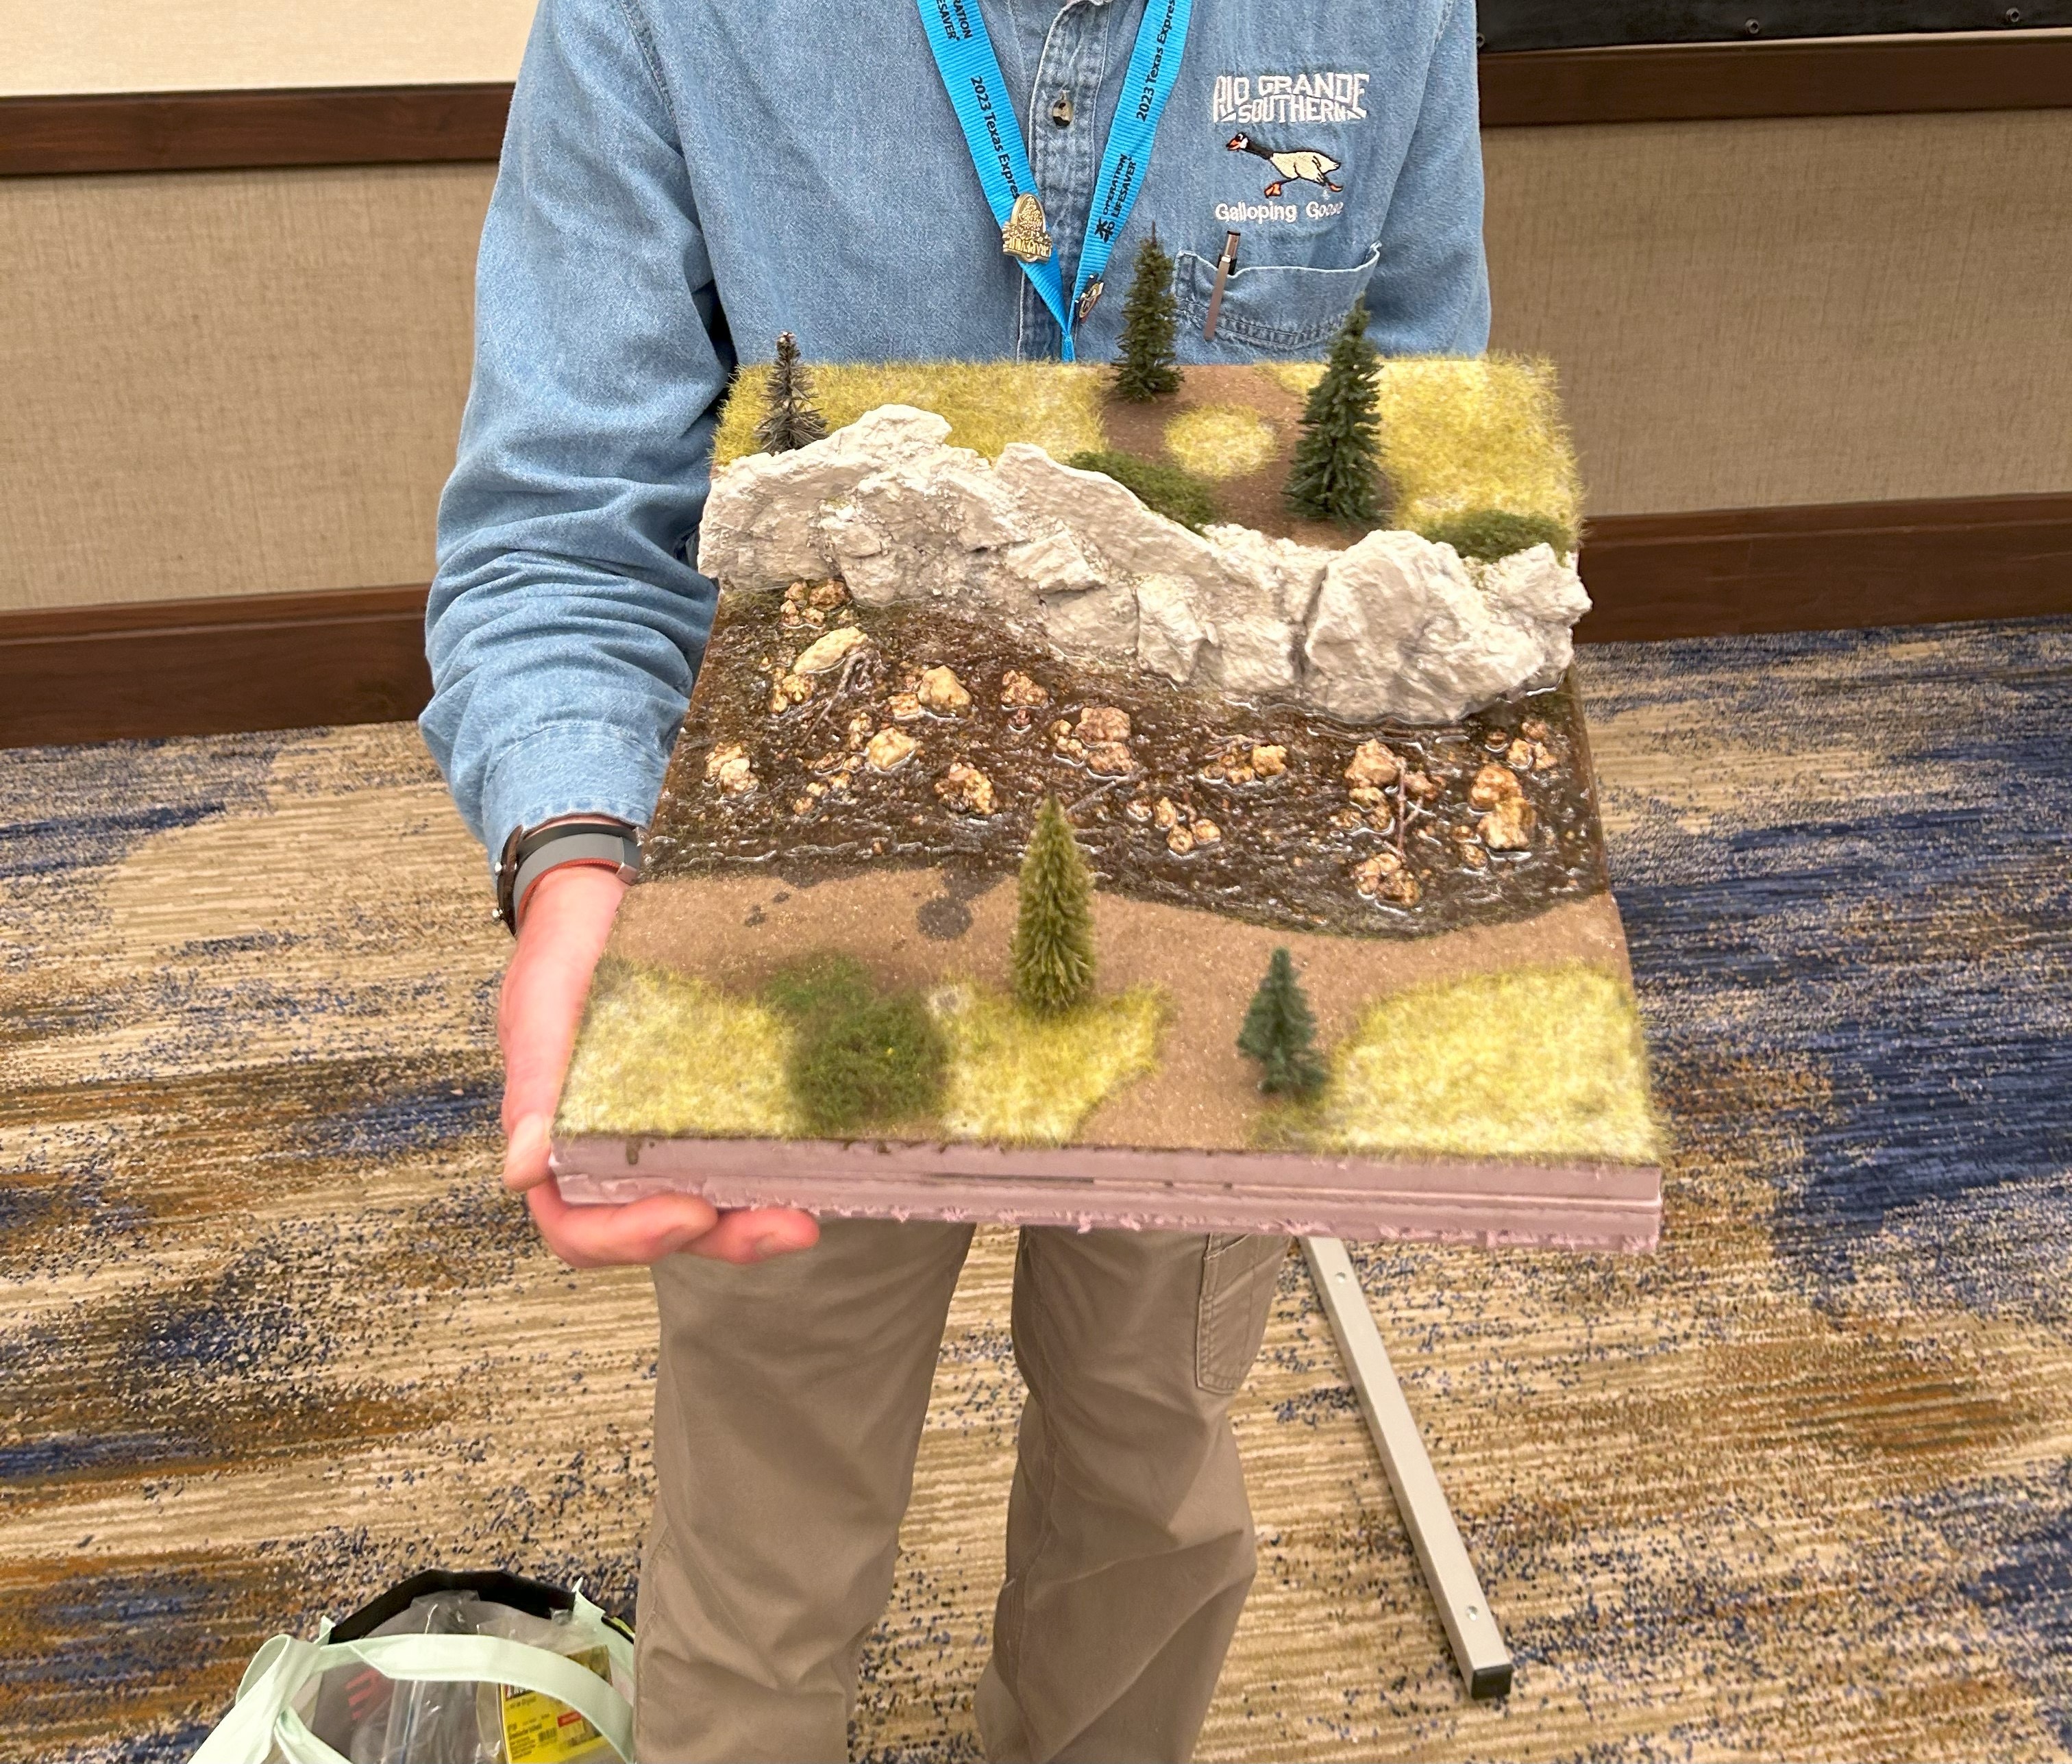
6. MWTM® - Making a Creek Scene Diorama – PART A
Title: Making a Creek Scene – Part A
Cost: $95 (Total for Parts A and B)
Scale: Any
Date: Tuesday, August 6, 2024
Time: 6:30pm - 10:30pm
Lead Instructor: Carl Smeigh, MMR® , assisted by MMRs MMRs Jim Gore, Peter Youngblood, and Clark Kooning.
YOU MUST SIGN UP FOR BOTH PARTS A & B!
In Part A of this pair of clinics, Carl and his team of MMRs will lead you through the process of building a
creek bed and water-side details including a rock face and a beach. He will go through pouring the “Water” used in scene. You will learn how to make build a creek bed, add bottom and shore details with the final step of “pouring the water”and adding “motion” to give a realistic water scene.
Part A will be building the diorama, adding rocks to one side and a beach to the other side of the creek, completing the creek bed, painting or dirtying the creek bed, adding any desired underwater details and pouring resin for the water.
Part B will finish the diorama after an overnight curing of the resin, adding surface water details detailing the shoreline and the area above the rock wall. Grass, bushes and trees are added to finish the scene.
Participants need to bring their own tools to participate in this clinic!
This is a suggested list of tools that may be required to participate fully in the hands-on portion of our program. Bring any other tools you usually use or might find useful. To allow you to fully take part in the building of models, you are strongly encouraged to have all the tools listed. You, however, may not use all of them in this program, but you will have them for future building. Most of the tools listed can be found at your local hobby shop, hardware store or craft store.
18mm utility knife with spare blade (Home Depot/Lowes)
60 and 100 grit sandpaper
Plastic Palette knives set (Michaels or other hobby store)
3/8” or ½” stiff flat bristle brush (Michaels or other hobby store)
1/2" stiff bristle brush)
1" or 2" paint brush
Collection of small paint brushes
Fan brush (these are paint brushed where the bristles are flat and spread out about 1/2". You can see through the brush bristles. You will use it to dry brush the rocks and the water.
1" putty knife
Hot glue gun
Pliers, garden variety type
Tweezers
Optional Tools
Opti-visor
Extra work light
Static Grass Machine
Dust buster type small vacuum
Required Modeling Materials to be provided by modeler:
Pint-sized container full of dirt you use on your layout. If you do not have any dirt for your layout, bring a container of dirt from your yard.
A collection of things you think you might find along your water’s edge and on the bottom (sized to your scale). This includes ties, logs, rocks, whatever you might find on the bottom or sides of the body of wa-ter associated with your layout (car parts, trash, etc. be open minded and creative). Bring some of the dirt you use on your layout (for the bed of the creek) making sure you have more than just very fine dirt. Bring a couple of nice sized rocks (to scale for your layout) to stick up out of the creek that water will flow around. Carl Smeigh will provide materials and tools to add grass and bushes, if you want you want to add trees, bring some in your scale.
To build your version of a rock wall, we will provide a collection of castings for you to use; 12" by 12" square of Owen Corning foam for a base and the smaller pieces to build the basic structure.
You will use your hot glue to build the basic structure. We will provide the dry joint compound and ground up foam for your "Goop" and a small choice of colors plus white and black for you to mix paints and color your rocks.
Provided Materials:
Glues, plaster and paints.
Rock castings that you can select from to make your rock wall.
Foam to be used to build the diorama.
Two-part Resin for the water and Woodland Scenic water effects, waves and ripoles.
We will provide materials to add static grass and small bushes.
We think you will find this to be more than just model building, we will explore your artistic side. Please do not get nervous, what you need is in you, you just need to take a leap of faith, dig in and do it. Worst case, we will help you do it.
7. MWTM® - Making a Creek Scene Diorama – PART B
Title: Making a Creek Scene – Part B
Cost: $95 (Total for Parts A and B)
Scale: Any
Date: Wednesday, August 7, 2024
Time: 7:30am - 11:30am
Lead Instructor: Carl Smeigh, MMR® , assisted by MMRs MMRs Jim Gore, Peter Youngblood, and Clark Kooning.
YOU MUST SIGN UP FOR BOTH PARTS A & B!
Part B will finish the diorama after an overnight curing of the resin, adding surface water details detailing the shoreline and the area above the rock wall. Grass, bushes and trees are added to finish the scene.Part B of this pair of clinics, Carl and his team of MMRs will lead you through the process of building a creek bed with waterside details, including a rock face and a beach. The team will explain and demonstrate the process of pouring the “Water” used in scene, and you will learn how to build a creek bed, add bottom and shore details, with the final step of “pouring the water” and adding “motion” to create a realistic water scenee.
Participants need to bring their own tools to participate in this clinic!
SEE PART A for tool list!
YOU MUST SIGN UP FOR BOTH PARTS A & B!!!
Participants need to bring their own tools in order to participate in this clinic
Provided Materials:
Glues, plaster and paints.
Rock castings that you can select from to make your rock wall.
Foam to be used to build the diorama.
Two-part Resin for the water and Woodland Scenic water effects, waves and ripoles.
We will provide materials to add static grass and small bushes.
We think you will find this to be more than just model building, we will explore your artistic side. Please do not get nervous, what you need is in you, you just need to take a leap of faith, dig in and do it. Worst case, we will help you do it.
8. MWTM® - Kitbashing a Freight Shed
Title: Kitbashing a Freight Shed
Cost: $60 Scale: HO
Date: Wednesday, August 7, 2024
Time: 1:00pm - 5:00pm
Lead Instructor: Peter Youngblood , MMR® , assisted by MMRs Clark Kooning, Jim Gore and Carl Smeigh.
In this clinic MMR
® Peter Youngblood and his team of MMRs will guide you through the construction of a generic trackside shed using a provided plastic HO scale 50 ft. box car shell, and then adding optional concrete steps. Construction methods are applicable to all scales.
Participants need to bring their own tools to participate in this clinic!
This is a suggested list of tools that may be required to participate fully in the hands-on portion of our program. Bring any other tools you usually use or might find useful. To allow you to fully take part in the building of models, you are strongly encouraged to have all the tools listed. You, however, may not use all of them in this program, but you will have them for future building. Most of the tools listed can be found at your local hobby shop, hardware store or craft store.
Self-healing cutting mat, minimum 8 1/2” x 12” (Mandatory item)
#1 X-Acto knife
#11 Xacto blades (5 pack)
#2 sharpened Pencils (2)
Razor Saw w/fine tooth blade
Metal Miter Box 8 ½” x 12” (or larger)
Small hobby square
HO Scale Ruler
Fine pointer tweezer
Emery boards (the ones women use to file their nails)
Liquid Styrene Cement (glue)
1 Package Handy Wipes
Optional tools:
Opti-visor
Extra Work Light